Facebook ADS
How to Successfully Change Your Facebook Page Name in Just 5 Minutes
Do you want to change your Facebook page name to better align with your brand direction, business strategy, or simply to refresh your image? Changing your Facebook page name not only helps you update accurate information but also supports optimizing the page according to your development goals.
1. Conditions and Facebook regulations for changing page name
Before deciding to change your Facebook page name, you need to note some conditions and regulations to ensure a smooth process:
Number of Likes Affects Approval Time:
- Under 200 likes: Name changes are almost instantly approved by Facebook. The process is quick, and you will receive a notification immediately after the request is reviewed.
- From 1,000 to under 5,000 likes: The review period can take from 3 to 7 days because Facebook needs to carefully verify the validity of the name change request.
The New Name Must Be Related to the Old Name: When changing, the new name should maintain a connection to the current page name to avoid rejection. For example, a page named “Thiết bị vệ sinh Shome” can change to “Showroom thiết bị nhà tắm Shome,” but changing to a completely unrelated name has a high chance of being denied.
Time Restriction on Name Changes: After your name change request is approved, you must wait 60 days before you can change the page name again.
Authority to Change Name: Only the page administrator (admin) has the right to submit a name change request. If you are not an admin, contact someone with admin rights to perform the change.
Page Must Be Public: To change the name, the page must be set to public mode. If the page is restricted or hidden, you need to resolve this before submitting the request.

==> See also: Quality Facebook Ad Account Rental Services
2. Detailed guide to changing your Facebook page name
How to change your Facebook page name on a computer
If you want to change your Facebook Fanpage name using a computer, follow the detailed steps below. The process is simple, fast, and easy to perform.
Quick Guide
Go to Facebook and select the page you want to rename > Click on Settings > Page Settings > Name > Enter the new name you want > Review changes > Submit change request.
Detailed Instructions
Step 1: Open your browser and go to the Pages section on Facebook via the link: facebook.com/pages. Select the page you want to rename and make sure you have admin rights to edit the page.
Step 2: In the page management interface, look at the left column and click on Settings. Then find the Page Settings section indicated by a flag icon.

Step 3: Click on Name > Edit > Enter the new name, then press Review Changes so you can double-check the information before submitting the request.
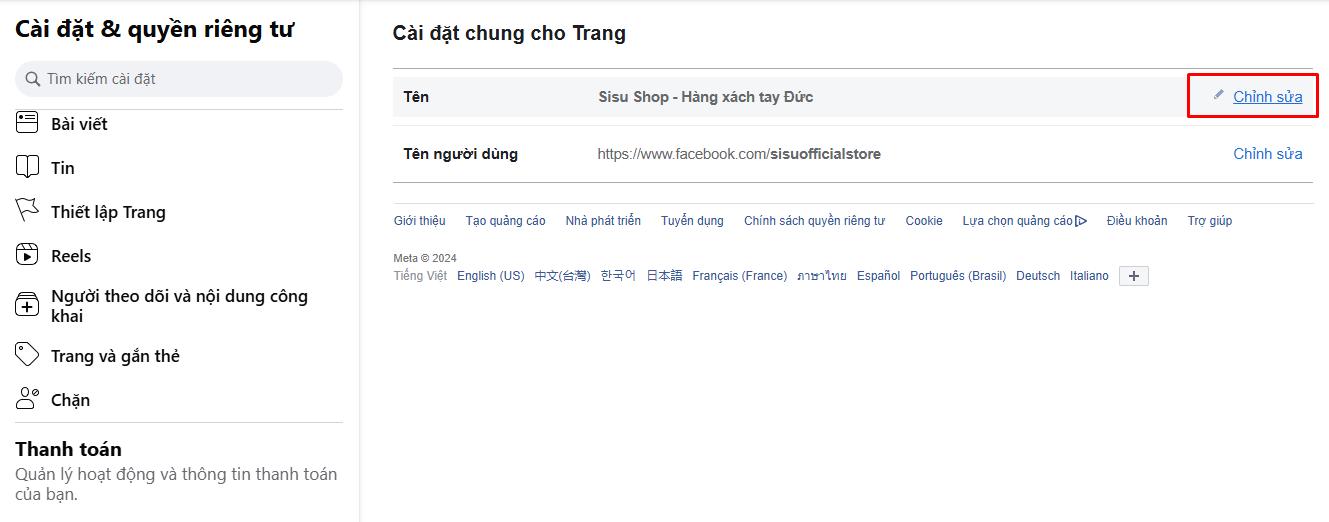

Step 4: Once you are sure about the information, enter your password to confirm and submit the name change request.
Note: The approval process for the new name may take some time depending on Facebook’s policies and regulations.
How to change your Facebook page name on mobile
Step 1: Open the Facebook app on your phone. Tap the Menu icon (three horizontal lines) located at the bottom (iPhone) or top (Android). Select Pages and find the page you want to edit.

Step 2: Once inside the page, tap Settings & Privacy, then select Settings.

Step 3: In the Settings interface, scroll down and select Page Settings. Here, you will see the Page Name section. Tap it and enter the new name you want to use.

Step 4: After entering the new page name, tap Review Changes to ensure the new name is accurate and complies with Facebook’s policies. Finally, select Submit for Review to send the name change request to Facebook.

3. Important notes when changing your Facebook page name
Before proceeding with the latest method to change your Facebook page name, to ensure a smooth and successful process, please pay attention to the following points:
- Page Administrator: To change the Facebook page name, you must be an administrator of that page. This ensures that only those with the highest level of authority on the page can make such important changes.
- Name Change Frequency: Avoid changing your page name too frequently in a short period. Although Facebook has not specified an exact timeframe, excessive name changes may cause your page to be flagged as spam and result in feature restrictions.
- Location of Name Change: Choose the location where you change the page name carefully. Make sure this option is not restricted by Facebook for your page.
- Compliance with Policies: Before deciding to change your page name, take time to carefully read Facebook’s policies and regulations regarding name changes. Ensure the new name complies with these policies and does not violate any rules.
This concludes all the sharing from LoLo Media about how to change your Facebook page name along with important notes to keep in mind during the process. We hope this information helps you change your page name quickly and easily. Wishing you great success with your Facebook page!