Facebook ADS
Detailed Guide on How to Create a Facebook Group with Many Members
If you want to connect people with shared interests, create a learning space, or develop a business, a Facebook group can become a place that brings everyone together. In this article, you will find a detailed guide on how to create a Facebook group with many members, how to attract members to join, and tips to keep your community lively.
1. What is a Facebook Group?
A Facebook Group is an online space for people who share common interests, concerns, or goals. It is a place where people can interact, discuss, and share information and personal opinions on specific topics in life, ranging from personal hobbies, studying, to business or event organizing.
The group administrator (Admin) plays the role of managing activities, approving member requests, and overseeing content within the group to ensure a positive and appropriate interactive environment.
Anyone with a Facebook account can easily create and manage their own group. Additionally, a Facebook user can join up to 6,000 different groups without any restrictions, helping to expand their network for effective interaction and sharing.
Facebook groups are not only places for exchanging information but also useful tools to build a connected community and share values, from personal conversations to professional business strategies.

==> See also: Quality Facebook Ad Account Rental Services
2. Types of Facebook groups
Facebook offers three main types of groups, each with distinct characteristics, allowing you to flexibly choose the format that best suits your goals:
Public Group
- Anyone on Facebook can find the group through search tools.
- Both members and non-members can see the posts.
- Anyone can join without approval (if this setting is enabled).
Private Group
- Only group members can see the posts.
- The group still appears in search results, and outsiders can request to join.
- Admins must approve new members.
- Suitable for communities with limited shared content, needing privacy but still wanting to attract new members.

3. Detailed guide on how to create a Facebook group
How to create a Facebook group with many members using a mobile phone
Creating a Facebook group with many members can be easily done right on your mobile phone.
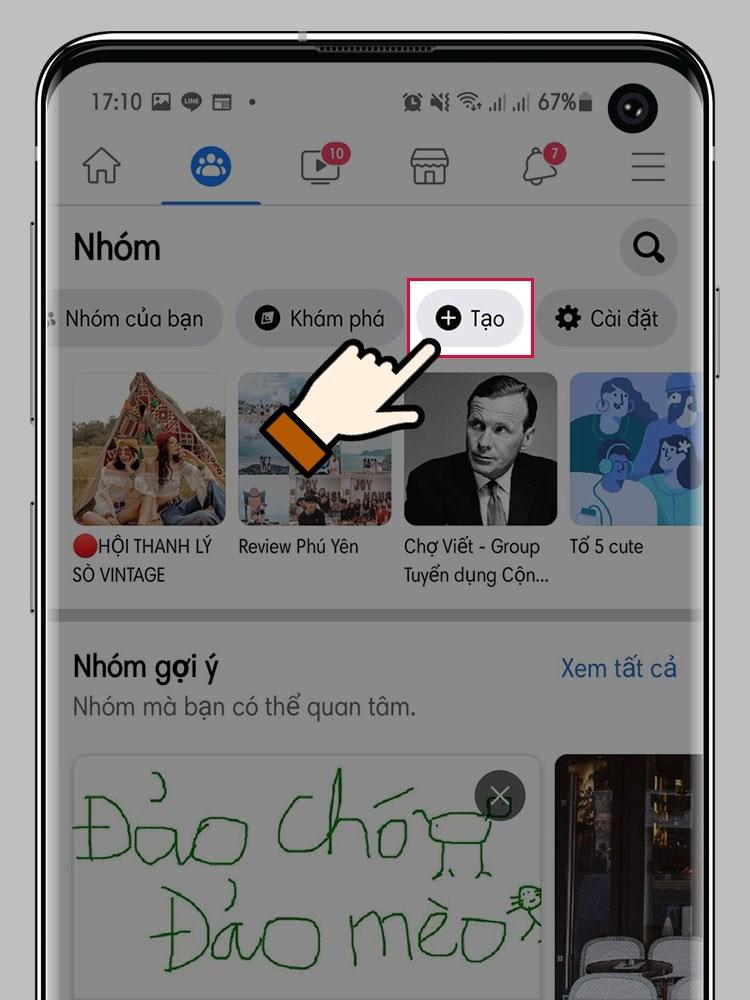
Step 1: Open the Facebook app on your phone. Tap the menu icon (three horizontal lines) in the top right corner. Select Groups from the list.

Step 2: Tap the Create Group button to start the process.
Step 3: Name your group: Choose a memorable, attractive name that fits the group’s purpose.
Step 4: Set privacy settings:
- Public Group: Anyone can find the group, see members and posts within the group.
- Private Group: Only group members can see the content, but the group can still be found via search.

Group Visibility:
- Visible: Non-members can find the group but cannot see the content.
- Hidden: Only group members can see and access the group.
Step 5: Add friends from your contact list to the group to start building the community.
Step 6: Tap the Create Group button to complete the setup. Customize your group by:
- Adding an eye-catching cover photo.
- Updating the group description to introduce the group’s purpose and content.
How to create a Facebook group with many members using a computer
Step 1: From your News Feed, look at the menu on the left and click Groups.

Step 2: Click the Create New Group button. This is the first step to building your own community.

Step 3: Fill in the basic information for the group:
- Group Name: Choose an appropriate and attractive name to draw members.
- Privacy Settings: You have two options:
- Public: Anyone can see and join the group.
- Private: Only approved people can join.

Step 4: Invite the people you want to join the group by entering their names or emails. Click Create to complete the process.
Step 5: Personalize the group and complete the remaining information:
- Add a Cover Photo: Use a beautiful, high-quality image to represent the group.
- Write a Group Description: State the purpose, rules, or important information to help members better understand the group.
- Set Group Visibility: Choose between Visible (Anyone can find this group) or Hidden (Only members can find this group).
4. Notes when creating a Facebook group
Facebook allows any user to create a group, but to ensure the group operates effectively and to avoid unwanted situations, you should keep the following points in mind:
Anyone can create a Facebook group: Whether you are an individual or a business, as long as you have a Facebook account, you can start building a group. This makes it easy for everyone to create a private space to connect and share.
Transparency when joining groups: When you join a Facebook group, whether it is public or private, your friends can still see this activity. This is something to consider if you want to keep your group memberships confidential.

Leaving a group does not trigger notifications: If you decide to leave a group, Facebook will not notify the remaining members. This allows you to leave freely without worrying about affecting others.
Deleting a group is not easy: To delete a group, you need to remove all members, including other admins (if any). Only when you are the last member left can you completely delete the group.
Creating and developing a Facebook group is not only an opportunity to connect with people who share your interests but also a great way to promote yourself or your business. By applying the method of creating a Facebook group with many members shared in this article, you can confidently start your journey to build a strong and valuable community for yourself.