Facebook ADS
How to Easily Delete a Facebook Page Using Phone or Computer
Are you looking for a way to delete a Facebook Page but don’t know where to start? Don’t worry! In this article, LoLo Media will guide you through detailed steps to quickly delete a Facebook Fanpage on both computer and mobile devices.
1. Why do you need to delete a Facebook Page?
Deleting a Facebook Page may be necessary in various situations, including:
- No longer in use: If your Page is inactive or you no longer want to manage it, deleting the Page is a reasonable decision.
- Starting a new Page: If you change direction and want to build a new Page that better suits your current content or goals, deleting the old Page helps you start fresh without being affected by elements from the previous Page.
- Security: Deleting the Page helps you remove unnecessary information and reduces the risk of malicious exploitation.
==> See also: Quality Facebook Ad Account Rental Services
2. How to delete a Page on a computer
Quick guide: Open the Page you want to delete > Settings > Select Page Access and Control > Choose Delete Page > Click Continue > Follow the instructions > Click Continue twice consecutively to permanently delete the Page.
Detailed instructions:
Step 1: Access the Fanpage you want to delete and find the Settings section (usually located in the left menu or top corner of the screen).
Step 2: In Settings, scroll down to the bottom and click on Page Access and Control to open related options.

Step 3: Here, you have two options: Deactivate Page (temporary) or Delete Page (permanent):
- Deactivate Page: Allows you to temporarily disable the Page without deleting it completely. The Page will not be publicly visible but can be reactivated at any time: Deactivate Page > Continue > Enter your password to proceed > Continue > Select a reason > Continue > Choose Log Out and Archive (if needed) > Set automatic reactivation time and click Continue once more to complete the process.

- Delete Page: All information will be deleted within 14 days from the time of deletion: Select Delete Page > Continue > On the Permanent Delete Page interface, follow any suggestions if you want > Continue > Enter your password to confirm ownership of the Page > Continue > Select Delete > OK.


After confirmation, your Page will enter a 14-day pending deletion period before being permanently deleted.
3. How to delete a Facebook page using a mobile phone
Quick guide:
On the Page interface, tap the Menu icon > Select Settings & Privacy > Choose Settings > Tap Access and Control > Choose either Deactivate Page or Delete Page > Tap Continue, select a reason, and complete the remaining steps.
Detailed instructions:
Step 1: On the Facebook app, tap the Menu icon (three horizontal lines):
- Android: Menu is at the top right corner.
- iOS: Menu is at the bottom right corner.
From the list, select the Page you want to delete.
Step 2: On the Fanpage interface, tap Settings & Privacy, then select Settings to open page management options.

Step 3: In Settings, scroll down to find Access and Control. Here, you have two options: Deactivate Page and Delete Page.
- Deactivate Page: Temporarily disables the Page; you can reactivate it anytime.
- Delete Page: Permanently deletes the Page; you will no longer be able to access any content or information shared under this Page on Facebook.

After choosing one of these options, the system will ask you to provide a reason for your decision. Follow the prompts to complete the deletion process.
Notes:
- Deletion waiting period: The Fanpage will be in a pending deletion state for 14 days. During this time, you can change your mind.
- Cancel deletion: To cancel deletion, simply go back to Settings and select Cancel Page Deletion.
- Permanent deletion: If you do not cancel within 14 days, the Fanpage will be permanently deleted and cannot be recovered.
4. How to cancel Facebook page deletion
If you have requested to delete a Page but then change your mind, don’t worry. Facebook allows you to cancel the deletion request within 14 days from the confirmation date.
Step 1: Log in to your Facebook account and open the Fanpage you scheduled for deletion.
Step 2: Click on Settings, usually located at the top right corner of the screen or in the left menu (depending on the interface version). Here, you will see a notification that your Fanpage is scheduled for deletion.
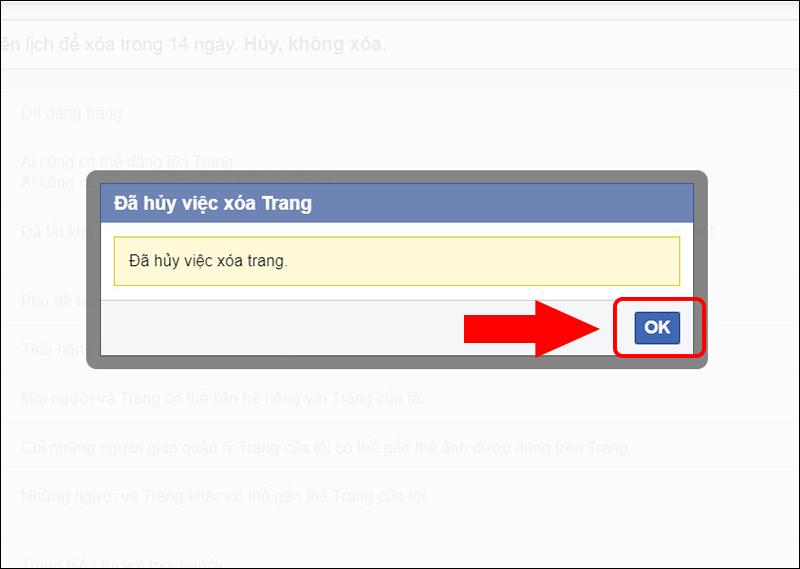
Step 3: Click the Cancel Deletion button to stop the deletion process.
Step 4: A confirmation dialog will appear asking you to confirm the cancellation. Click Confirm to complete.
Once these steps are successfully completed, your Fanpage will be retained and function normally as before. You can continue managing, editing, or delete the Page at a later time if you wish.
5. Frequently Asked Questions
Is it possible to recover a deleted Page?
No. Once a Page is permanently deleted, it cannot be recovered. After you initiate deletion, Facebook keeps the Page in a pending deletion state for 14 days. If you do not cancel within this period, the Page will be permanently deleted and unrecoverable. Therefore, carefully consider before proceeding.
Does deleting a Page affect my personal Facebook account?
No. Deleting a Page does not affect your personal account. Your access, activities, and personal information on Facebook remain intact; only the Page is deleted.

How to delete multiple Pages at once?
Currently, Facebook does not support deleting multiple Pages simultaneously. If you manage multiple Pages and want to delete them, you must delete each Page individually.
Why can’t I delete my Page?
If you have followed the instructions but still cannot delete the Page, the most common reason is that you are not an admin of the Page. Only users with the highest administrative rights can delete a Page. Check your role in the Page’s settings. If you don’t have admin rights, contact the Page admin for assistance.
Deleting a Facebook Page is quite simple if you follow the steps above. Make sure to back up important data before deleting to avoid losing information. If you have any questions, don’t hesitate to contact LoLo Media for support.